Docker Introduction with R
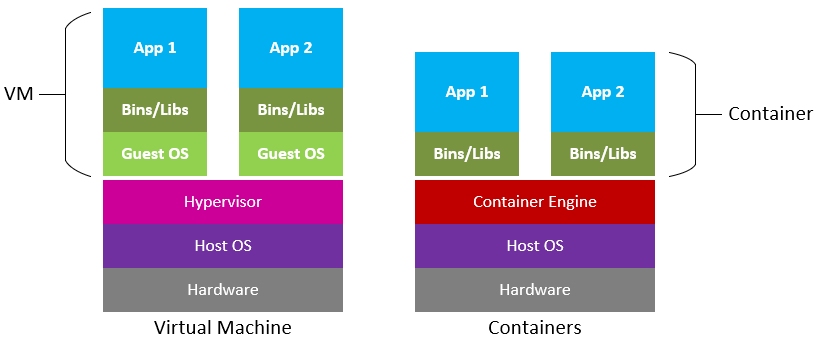
Docker technology has become one of the highly used technologies in software development world, developers are now able to develop, replicate and ship containerized application(s). The system works in such a way that the container runs an isolated environment from the host machine. A closely related way of doing it would be through spinning a virtual machine and then installing an Operating system together with the dependencies but such an approach is abit limiting and somewhat expensive in terms of resources as compared to containerization which is lightweight, as such, speedy and portable in terms of sharing.
The image below helps to illustrate how docker works in comparison to a virtual machine
Docker
Docker is a computer system that helps you to create a loosely isolated environment (from your computer) called a container for your application(s). The environment is isolated from host machine in the sense that the container can have an application, operating system with a different version and dependencies from the ones existing on your host machine, in other words, we can have an R version 3.1.2 inside the container while in the host machine we have R version 3.4.1.
Why docker?
- Shiny is single threaded, this means multiple users of an app use one session which often times creates problems. This is solved by containerization because with docker every user gets a spinned container of the shiny app.
- Often times packages and dependencies bring problems when they get updated such that a shiny application which was working stops working just because some version of a package previously used was updated to another version.
Docker architecture
The following image gives us an overview of how the docker system works
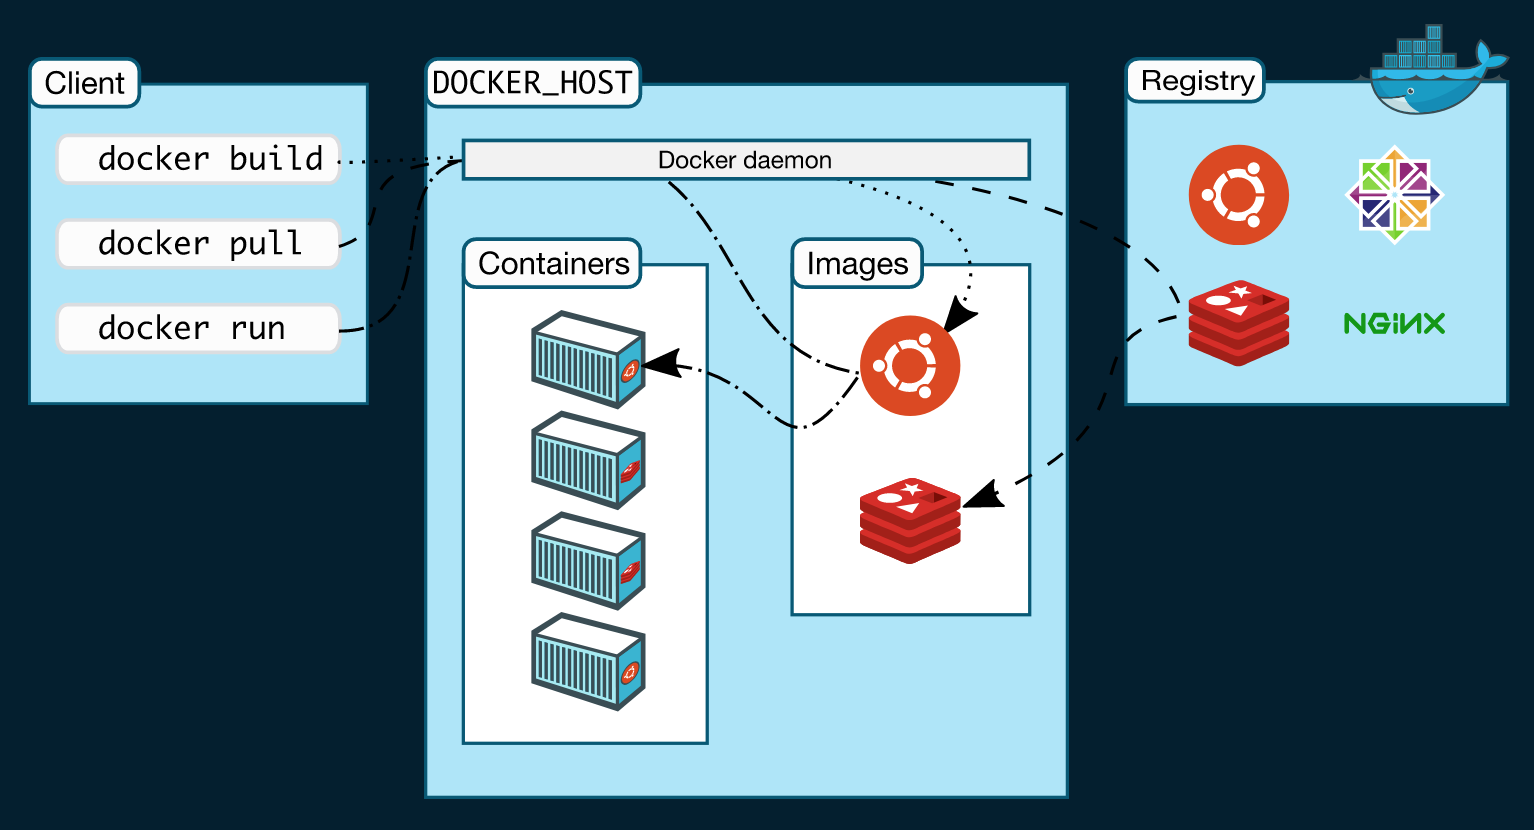
docker client:
The client provides the user a command line interface where you run docker commands that talk to the docker daemon through an API.
docker daemon:
This is the manager of docker objects ; images, containers, networks, and volumes.
- images: this is a file with instructions used to create a container. An image is created from a Dockerfile.
- Dockerfile: this is a text file with instructions/commands for building an image.
- container: a runnable instance of an image.
- network: a system of connecting docker containers.
docker registry:
This is where docker images are stored, shared and managed.
Installation
Docker system is built on linux however, for windows and Mac users you can still install a desktop version as explained in the procedures below:
Installing docker on Mac
Installing docker on Windows
Dockerfile
Below is a simple example of a Dockerfile that I built from the Education app that I developed earlier(see previous articles).
FROM rocker/shiny-verse:latest
USER root

RUN R -e 'install.packages("devtools")'
RUN R -e 'devtools::install_version("shiny",version="1.6.0",dependencies=T)'
RUN R -e 'devtools::install_version("ggplot2",version="3.3.0",dependencies=T)'
RUN R -e 'devtools::install_version("dplyr",version="4.9.2.1",dependencies=T)'

COPY ./www/ /shiny/dashboard/www/
COPY app.R /shiny/dashboard/

EXPOSE 3838

CMD R -e 'shiny::runApp("/shiny/dashboard" , port = 3838, host= "0.0.0.0")'
On your commandline you can use *touch Dockerfile* to create an empty file to begin with then use your preferred text editor to add layers to it..
FROM
This is the first layer of our dockerfile, it specifies the base image that will be used to build the new image. Every dockerfile starts with this layer and you will often times use another image as your starting point. An alternative way would be starting from scratch by installing the required dependencies but that would be more work which may not be necessary.
For our image we are using r-base from rocker as our base image then add layers to it.
USER
This command specifies the user, in this case root. The specified user will be used to run the subsequent RUN, COPY, EXPOSE and CMD commands.
COPY
The copy command copies files or directories from the host machine to the container.
The command has two paths:
- path-in-host and path-in-container
It takes the form:
for files
path-in-host/file.txt path-in-container/ notice there is a space between the two paths. an example is: /rprojects/mydash1/app.R /rprojects/mydash1/ from the above line we’re copying the file app.R from the folder mydash1 which is inside rprojects into the folder mydash under rprojects folder in the container.
for folders
path-in-host/myfolder/ path-in-container/
- if you don’t put the forward slash at the end of the folder name it will be treated as a file not a folder.
-
when copying myfolder only the contents will be copied into path-in-container, to create myfolder then write
*path-in-container/myfolder/
By writing it that way - myfolder will be created in the container file system without necessarily using mkdir command and then,
the contents of myfolder from the host machine will be pasted therein. - If by any chance your path has white space i.e projects/my folder/ then use COPY [“/projects/my folder/”, “/projects/my folder/”]
- If you have multiple files say starting with mod… then you can copy all of them using COPY mod* /myfolder/ . All files starting with mod will be copied.
For our case the first line copies the www folder which contains some images we’ve used. The second line copies the app.R script file which has the ui and the server code for building our application.
RUN
This instruction executes the given command inside the container. In this case we have used it to install necessary packages inside the container.
Notice that we started with installing devtools first such that we can use it to install specific versions of the required packages.
CMD
CMD command tells docker which command to run inside the container. For this case its the
EXPOSE 3838 This command instructs the container to open up the network port 3838 to the outside world.
Building the image
Once we’ve written our dockerfile as explained above navigate to the working directory containing you application files and enter the following command to build the image:
docker build -t nameofimage .
The -t tags our image, as in, it gives our image a name.
The . instructs docker to use the Dockerfile in the current folder. Otherwise we would have given it the path to where the Dockerfile is located.
N/B remember to replace the nameofimage to your desired name. If you have a docker hub account you can use yournameindockerhub/nameofimage
Spinning the container
You will have to wait for some minutes for your image to be built depending on the specs of your computer, internet speed and how big your application is.
After the image is successfully built use the following command to check if the image exists in your system.
docker images
The command lists all the images in your computer which you either built or pulled from docker registry. You can now check if the image you have built is there.
To spin a container from the image we use:
docker run -it --rm -p 3838:3838 -v '/pathtofolder/data':'/shiny/data' nameofimage
docker run is the command for spinning a container from a docker image.
-p 3838 publishes the port to the outside world.
-v : mounting a volume. The -v tag tells docker to mount the data folder located at ‘/pathtodatfolder/data’ on to ‘shiny/data’ inside the container.
Well, remember when we were creating our dockerfile we did not create the data directory so you might be wondering how this will work, no need to worry. What happens is docker will automatically create the folder inside the container and then mount link it to the data folder inside the host machine.
Finally you can now check locahost:3838 on our browser to see your containerized application.
And huuurrraaaayyy !! we have managed to containerize our application.
You can spare some time and visit the following pages for your further reading: